
Guide · Email with your own domain
Email with your own domain: setting up florian@your-domain.com — what you do and why
An address of your own like you@your-domain.com looks professional and belongs to you. This guide shows you step by step how to set it up — and why four small DNS records are all it takes.
Last updated: 14 August 2026
Step 1
Why an address on your own domain?
Picture two emails in your inbox: one from mueller.carpentry1987@hotmail.com, one from info@mueller-carpentry.com. Which sender looks more trustworthy? That's exactly the point:
- Trust: an address on your own domain signals: there's a real business behind this — not a throwaway address.
- Brand: every email carries your name (or your project's) in the sender line. Free advertising with every message.
- Independence: the domain belongs to you. If you switch email providers later, your address stays the same — nobody has to learn a new one.
Why not just stay with Gmail & co.? For private use: perfectly fine. But as soon as you write on behalf of a business, a club or a project, first impressions count — and they start in the other person's inbox, before the email is even opened.
Step 2
Web ≠ mail: two separate services
A common misconception: "My website runs on my server, so my email has to run there too." Not true — web hosting and email hosting are two separate services that only talk to each other via DNS. Your website stays exactly where it is. Your web VPS isn't even touched in this guide.
For email you rent a mailbox from a mail provider — in this guide mailbox.org, a German provider with servers in Germany, starting at a few euros a month. The path of an email then looks like this:

Why this separation is a gift: you can improve website and email independently, or switch providers, without touching the other one. And you don't have to worry about the hardest topic in email operations — deliverability (see the excursus below).
Step 3
The four DNS building blocks
Everything you set up is four records in DNS — the same "phone book" that also holds your website's A record. Each has its own job:
MX — where does the mail go?
What: the MX record ("Mail Exchange") tells the internet which server accepts email for your domain.
Why: without MX, nobody knows where a mail addressed to you should be delivered — senders get their mail bounced back as undeliverable.
SPF — who may send?
What: the SPF record ("Sender Policy Framework") lists which servers are allowed to send mail on behalf of your domain.
Why: otherwise anyone could forge mails with your address. SPF is your public list of permitted senders.
DKIM — the digital signature
What: DKIM ("DomainKeys Identified Mail") is a digital signature under every outgoing mail; the verification key sits in DNS.
Why: the receiving server can verify that the mail really came from your provider and wasn't altered in transit — like a seal on a letter.
DMARC — rules & reports
What: DMARC builds on SPF and DKIM and defines what should happen to mails that fail the checks — and sends you reports about it.
Why: that's how you see whether someone is trying to forge mail with your domain — and can tighten the rules step by step.
Why four records instead of one? Each building block covers a different weakness. Together they make sure your mails arrive (instead of landing in spam) and that fraudsters can't abuse your domain easily. Google and Yahoo now even require SPF, DKIM and DMARC from senders.
Step 4
Step by step with mailbox.org
Here's how it works in practice — plan for about an hour of work plus waiting time for DNS:
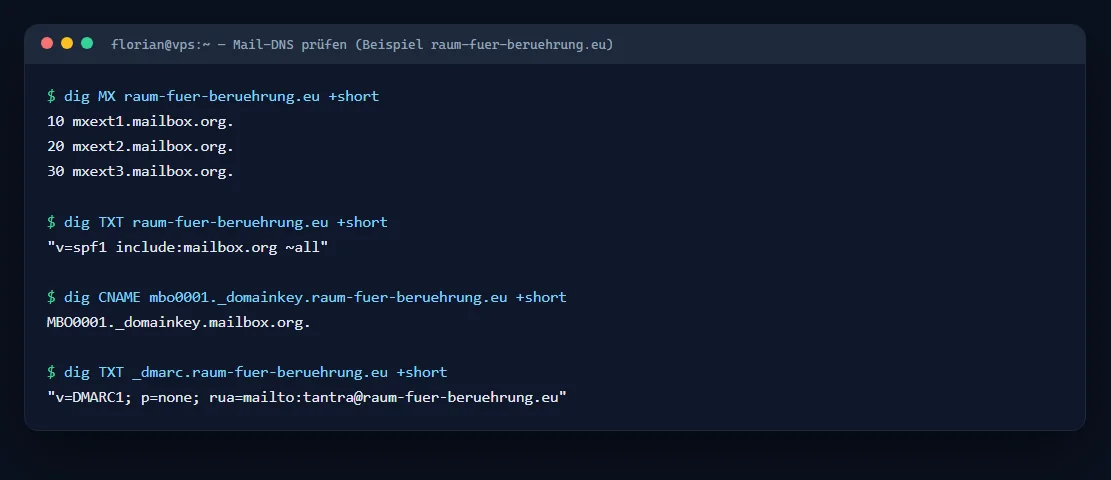
- 1. Add your domain in mailbox.org: in your mailbox.org account under Settings → "Custom domain", enter your domain. mailbox.org then shows you the exact DNS values for your account — copy them 1:1, don't guess.
- 2. Set the DNS records: at your domain's registrar (where your A record lives too), create the records from the table below. Important: your website's A record stays untouched!
- 3. Verify: click "check" in mailbox.org until all records are green. That can take minutes to hours — the DNS propagation from the VPS guide applies here as well.
- 4. Create mailbox & aliases: create your mailbox (e.g.
florian@your-domain.com); add free aliases likeinfo@orcontact@that land in the same mailbox. - 5. Test: send a mail from an external account to your new address (check receiving) and send a test mail to mail-tester.com — the free tool grades your deliverability. Goal: 10 out of 10, with SPF, DKIM and DMARC each showing "pass".
| Type | Name | Value | Job |
|---|---|---|---|
| MX | @ | mxext1.mailbox.org | Incoming mail, server 1 |
| MX | @ | mxext2.mailbox.org | Incoming mail, server 2 |
| MX | @ | mxext3.mailbox.org | Incoming mail, server 3 |
| TXT | @ | v=spf1 include:mailbox.org ~all | SPF: mailbox.org may send |
| CNAME | MBO0001._domainkey | MBO0001._domainkey.mailbox.org | DKIM signature |
| TXT | _dmarc | v=DMARC1; p=none; rua=mailto:your@address | DMARC: observe, reports to you |
Three notes: p=none in DMARC means "just observe for now, block nothing" — the right starting value; later you can tighten to p=quarantine. If your registrar has already set default MX records, remove those first. And: mailbox.org shows you account-specific values — when in doubt, what's shown there always wins.
Why the verification detour? mailbox.org has to be sure the domain really belongs to you — otherwise anyone could create mailboxes for other people's domains. The fact that you were able to set the DNS records is the proof of ownership.
Step 5
Excursus: why not just self-host email?
If you've read the VPS guide, the idea suggests itself: "I already have a server — why not run email there too?" Technically possible, but in everyday life almost always the wrong choice. Sending email today is a matter of trust — and trust has to be earned on the net:
- Port 25 often blocked: the sending port is locked by default at many VPS providers (spam protection) — without support unlocking it, nothing goes out at all.
- PTR / reverse DNS: your server's IP must point backwards to the mail hostname. Only the provider can set that, not you — if it's missing, many recipients reject your mails.
- IP reputation: fresh server IPs have no reputation. Big providers like Google treat mail from unknown IPs with suspicion for weeks — your mails land in spam even though everything is "correct".
- Blacklists: once your IP lands on a spam list (e.g. because a script got hijacked), the way back is tedious and slow.
- Constant maintenance: a mail server of your own is a popular attack target and wants continuous care, monitoring and hardening — for a single mailbox, the effort is completely out of proportion.
The bottom line: self-hosting email is worth it for learning — for reliable everyday use, a specialised provider like mailbox.org is the pragmatic way. You keep your domain address and full control of your data (servers in Germany), while professionals take care of deliverability, reputation and spam defence. Honest do-it-yourself also means knowing when to leave it alone.
Tick it off
Your final checklist
- Domain added in mailbox.org and the DNS values shown there written down.
- DNS set: three MX records, SPF (TXT), DKIM (CNAME), DMARC (TXT, starting with
p=none) — your website's A record stayed unchanged. - Verification green: mailbox.org recognises all records (propagation waited out).
- Mailbox & aliases set up: your main address plus info@/contact@ as you like.
- Test passed: receiving from external accounts works, mail-tester.com shows 10/10 with SPF/DKIM/DMARC = pass.
Goes well with this: Host your website yourself: VPS, domain & HTTPS — the matching next step
Rather not wrestle with DNS?
Understandable — I'll set up domain, email and website for you completely and keep looking after everything. You simply get your mailbox and start writing.